25 Ağustos 2022 Perşembe

kubectl autoscale seçeneği - Deployment İçin Kullanılır

Giriş
--min ve --max ile kaç tane pod istediğimizi belirtiriz.

--cpu-percent seçeneği
Örnek
Şöyle yaparız. Böylece ortalama işlemci kullanımı %50 civarında kalır
kubectl autoscale deployment echoserver --cpu-percent=50 --min=1 --max=4
Örnek
Şöyle yaparız
kubectl autoscale deployment testAppDeployment testAppHpa 
  --cpu-percentage=30 
  --min=1 --max=5
Diğer işlemler şöyle
# Get all the HPA
kubetl get hpa -A

# Describe an HPA resource
kubectl describe hpa testAppHpa 

# View YAML for HPA resource
kubectl get hpa testAppHpa -o yaml
Örnek
Şöyle yaparız
> kubectl autoscale deployment nginx --cpu-percent=10 --min=1 --max=5

> kubectl get hpa

NAME  REFERENCE          TARGETS   MINPODS   MAXPODS   REPLICAS
nginx Deployment/nginx   0%/10%    1         5         1           

kubectl create rolebinding seçeneği

Örnek
Şöyle yaparız
#  Role Based Access Control
$ kubectl create role fluent-reader — verb=get — verb=list — verb=watch — resource=pods
$ kubectl create rolebinding foo — role=fluent-reader — user=minikube

$ kubectl get rolebinding foo -o yaml

kubectl taint seçeneği

Giriş
Şeklen şöyle

Açıklaması şöyle. Taint, Pod Kovucu gibidir. Eğer Pod'un buna bağışıklığı yoksa o Node üzerinde çalışamaz.
In simple terms, Taints are like a Repellant spray. If we spray a taint on any node it will not allow any Pod to get scheduled on it.
Unless the Pod has the Toleration for that Taint being sprayed on itself.
3 tane taint çeşidi var. Açıklaması şöyle
NoSchedule : It means Pod without the toleration of the taint can’t be scheduled on the tainted node.

PreferNoSchedule : It means Pod without the toleration of the taint should not be scheduled on the tainted node. But if there is no other choice then it can be scheduled on the tainted node.

NoExecute : It means if a node is tainted while some Pods are running on it. The running pods which does not have toleration for that taint will get evicted from the node.
Örnek
Şöyle yaparız
$ kubectl taint node master foo=bar:NoSchedule
Örnek
Şöyle yaparız
kubectl taint nodes production-node app=red:NoSchedule
Şöyle yaparız. Pod'a kırmızı node için bağışıklık verdik. Eğer Pod, 2 tane node'a bağışık ise her hangi birisinde çalışabilir.
apiVersion: v1
kind: Pod
metadata:
 name: production-pod
spec:
 containers:
 - name: nginx-container
   image: nginx
 tolerations:
 - key: "app"
   operator: "Equal"
   value: "red"
   effect: "NoSchedule"


kubectl label seçeneği

label Neden Lazım
Worker'lara label verilerek bazı podların bu label'a sahip worker'da çalışması sağlanır.

Pod'u worker'a atamak için 2 yöntem var
1. nodeSelector
2. nodeAffinity
Açıklaması şöyle
nodeSelector — This is a simple Pod scheduling feature that allows scheduling a Pod onto a node whose labels match the nodeSelector labels specified by the user.
Node Affinity — This is the enhanced version of the nodeSelector introduced in Kubernetes 1.4 in beta. It offers a more expressive syntax for fine-grained control of how Pods are scheduled to specific nodes.
Inter-Pod Affinity — This feature addresses the third scenario above. Inter-Pod affinity allows co-location by scheduling Pods onto nodes that already have specific Pods running.

Worker Node'a label Vermek
Söz dizimi şöyle
kubectl label nodes <nodename> mylabel=somevalue
Örnek
Şöyle yaparız. Burada minikube isimlie node'a foo=bar etiketi atanıyor
kubectl label nodes minikube foo=bar
Worker Node'a Verilen Label'ları Listelemek
Şöyle yaparız
kubectl get nodes --show-labels
1. nodeSelector
Örnek
Şöyle yaparız
> kubectl label nodes host02 disktype=ssd
node “host02” labeled
Şöyle yaparız
apiVersion: v1
kind: Pod
metadata:
  name: httpd
  labels:
    env: prod
spec:
  containers:
  - name: httpd
    image: httpd
    imagePullPolicy: IfNotPresent
  nodeSelector:
    disktype: ssd
Örnek - Yanlış Kullanım
Şöyle yaparız
apiVersion: v1
kind: Pod
metadata:
  <snip>
spec:
  affinity:
    nodeAffinity:
      requiredDuringSchedulingIgnoredDuringExecution:
        nodeSelectorTerms:
        - matchExpressions:
          - key: topology.kubernetes.io/region
            operator: In
            values:
            - ca-central-1
  <snip>
  nodeSelector:
    topology.kubernetes.io/zone: "ca-central-1a"
    topology.kubernetes.io/zone: "ca-central-1b"
Açıklaması şöyle
All nodeSelectors must be matched. Node labels can only have a single value. Perhaps the developer thought that nodeSelectors were ORed and not ANDed, or perhaps this was just a careless mistake. Either way, Kubernetes is doing exactly what you told it to do by not scheduling the Pod on any worker, because the scheduling instructions were impossible to satisfy.

2. nodeAffinity
nodeAffinity yazısına taşıdım

kubectl create configmap seçeneği

Giriş
Komut satırı yerine declarative yöntemi kullanmak istersek kind: ConfigMap kullanılır

--from-env-file seçeneği
Söz dizimi şöyle
k create configmap <configmap-name> --from-env-file=<your-file-name>
Örnek
Elimizde mysql.txt diye şöyle bir dosya olsun
MYSQL_ROOT_HOST=root
MYSQL_ROOT_PASSWORD=password
Şöyle yaparız
k create configmap mysql-config --from-env-file=/root/mysql-env.txt

--from-file seçeneği
Söz dizimi şöyle. Yani --from-file ile dizin ismi veya bir dosya ismi verilebilir. Eğer dizin ismi verilirse o dizindeki tüm txt dosyalarını ConfigMap olarak yükler.
k create configmap user-config \
                      --from-file=<directory-name> or <file-name>
Örnek
Elimizde şöyle bir dizim olsun
root/config-files/
                 |- user-data.txt
                 |- admin-info.txt


# user-data.txt
username: superuser
password: admin123

# admin-info.txt
city: Nobeoka
state: Miyazaki
country: Japan
ve tüm dosyaları ConfigMap yapalım
# Configmap with directory
k create configmap user-config --from-file=/root/config-files
ConfigMap'e bakalım. Çıktısı şöyle. Burada user-config bir volume ve içinde de iki tane dosya var
> k get configmap user-config -o yaml

apiVersion: v1
data:
  admin-info.txt: |
    username: superuser
    password: admin123
  user-data.txt: |
    city: Nobeoka
    state: Miyazaki
    country: Japan
kind: ConfigMap
metadata:
  creationTimestamp: "2022-08-07T09:38:22Z"
  name: user-config
  namespace: default
  resourceVersion: "2007"
  uid: 915e805a-cb55-4309-977a-566b7a8ed6ac


Örnek
Şöyle yaparız
$ kubectl create configmap foobar —from-file=config.js
$ kubectl get configmap foobar -o yaml
--from-literal seçeneği
Söz dizimi şöyle
k create configmap <configmap-name> --from-literal=<key>=value \
                                    --from-literal=<key>=value
Örnek
Şöyle yaparız
k create configmap mysql-config --from-literal=MYSQL_ROOT_HOST=root 
                                --from-literal=MYSQL_ROOT_PASSWORD=password


kubectl rollout seçeneği

Giriş
Açıklaması şöyle
1. When we first create a deployment, it creates a rollout.
2. A new rollout creates a new revision.
3. In the future, when a new deployment (of same name) is triggered, a new rollout is created with increased version.
4. This helps us keeps track of changes made and enables us to rollback to previous version deployment.
5. To check status of rollout: `kubectl rollout status deployment <deployment-name>`
6. To check the history, revision and change-cause of rollout: `kubectl rollout history deployment <deployment name>`
history seçeneği
Örnek
Şöyle yaparız
# List history of deployments
$ kubectl rollout history deployment/DEPLOYMENT_NAME

# Jump to specific revision
$ kubectl rollout undo deployment/DEPLOYMENT_NAME — to-revision=N
restart seçeneği
Örnek
Şöyle yaparız
kubectl rollout restart deployment <deployment_name> -n <namespace>
status seçeneği
Örnek
Şöyle yaparız
$ kubectl rollout status deployment/test-deploy
undo seçeneği
Açıklaması şöyle
To rollback a deployment: `kubeclt rollout undo deployment <deployment name>` — this will also run in the similar sequence as it happened while upgrade.
Örnek
Bir önceki sürüme dönmek için şöyle yaparız
$ kubectl rollout undo deployment/nginx-deployment
Eğer daha da önce bir sürüm dönmek istersek history seçeneği ile sürümlere baktıktan sonra şöyle yaparız
$ kubectl rollout undo deployment/test-deploy --to-revision=3

24 Ağustos 2022 Çarşamba

KUBECONFIG Ortam Değişkeni

Not Kubernetes kitap iyi bir kaynak

Giriş
Açıklaması şöylekubeconfig dosyasının yolunu belirtir. Yani aslında kubectl ile hangi cluster'a erişmek istiyorsak onun ayarlarını içeren dosyayı belirtmek içindir.
Kubernetes clusterlarımıza kubectl ile (veya geliştirdiğimiz bir uygulama tarafından) erişmek istediğimizde, cluster bilgilerini barındıracağımız bir yere ihtiyacımız var. Kubeconfig tam bu noktada karşımıza çıkıyor. Default olarak ~/.kube/config pathinde yer alır fakat istersek kubectl'e farklı pathlerde kubeconfig belirtebiliriz.
İki tane yöntem var
1. KUBECONFIG ortam değişkenini kullanmak
2. kubetctl xxx --kubeconfig seçeneğini kullanmak

Örnek
Şöyle yaparız
export KUBECONFIG=/home/id_rsa_ucd_common/okd4/rlwy03/auth/kubeconfig
Örnek
Şöyle yaparız
kubectl get pods --kubeconfig=</.kube/another-config>


23 Ağustos 2022 Salı

Open Container Interface (OCI) Nedir

Giriş
High Level Runtime ve Low-Level Container Runtime arasındaki arayüz. Şeklen şöyle


Kubernetes Container Runtime Interface (CRI) Arayüzü Nedir - Bir Kubernetes Standardı

Giriş
Açıklaması şöyle. Yani Kubernetes tarafından tanımlanan bir arayüz veya standart diyelim.
CRI is a plugin interface that gives kubelet the ability to use different OCI-compliant container runtimes (such as containerd, docker or cri-o),without needing to recompile Kubernetes
Açıklaması şöyle. Yani Kuberneted CRI gRPC kullanır
The Kubernetes Container Runtime Interface (CRI) defines the main gRPC protocol for the communication between the cluster components kubelet and container runtime.
Şeklen şöyle


High Level Container Runtime Nedir? - Container Registry'den Image Alır ve Çalıştırması için Low-Level Container Runtime'a Verir

Giriş
Bazı  High Level Container Runtime'lar şöyle
1. containerd
2. cri-o
3. dockerd
5. rktnetes
6. frakti

Görevleri
High Level Runtime'ın görevlerinden bir tanesi Container Registry'den image'ı almak ve çalıştırması için  Low-Level Container Runtime'a geçmek. Şeklen şöyle
Açıklaması şöyle
While the low-level container runtime focuses on creating and deleting containers, the high-level container runtime will focus on managing multiple containers, transporting and managing container images, and loading and unpacking container images to the low-level container runtime.
High Level Container Runtime ve Open Container Interface (OCI) İlişkisi Nedir?
High Level Container Runtime, Open Container Interface (OCI) arayüzü aracılığıyla Low Level Container Runtime ile haberleşir. Şeklen şöyle


1. cri-o
 Açıklaması şöyle
CRI-O it is another high-level container runtime -alternative to containerd- which implements the Container Runtime Interface (CRI).

Both “containerd” and CRI-O can run Docker-formatted (actually OCI-formatted) images, they just do it without having to use the docker command or the Docker daemon.
Açıklaması şöyle
CRI-O is the CRI implementation provided by Kubernetes.By default, cri-o uses runC as its OCI, but on recent RedHat Fedora installations (with cgroups v2) it will use crun. Since it has full OCI compatibility, cri-o works out of the box with low level runtimes such as Kata without any additional pieces and minimal configuration.

Şeklen şöyle

2. containerd
containerd yazısına taşıdım

3. dockerd
Şeklen şöyle


21 Ağustos 2022 Pazar

kubectl get events seçeneği

Örnek
Şöyle yaparız
$ kubectl get events -n rlwy-04 
LAST SEEN   TYPE      REASON              OBJECT   MESSAGE
140m        Warning   TopoConnectFailed   ...      ...
Örnek
Şöyle yaparız
kubectl get events --sort-by=.metadata.creationTimestamp -n rlwy-08

12 Ağustos 2022 Cuma

Kubernetes kind: Service İle ExternalName Service

Giriş
Açıklaması şöyle
- This is commonly used to create a service within Kubernetes to represent an external datastore like a database that runs externally to Kubernetes.

- You can use that ExternalName service (as a local service) when Pods from one namespace to talk to a service in another namespace.
Örnek
Şöyle yaparız
apiVersion: v1
kind: Service
metadata:
  name: my-service
spec:
  type: ExternalName
  externalName: my.database.example.com

10 Ağustos 2022 Çarşamba

kubectl get clusterpolicies seçeneği

Örnek
Şöyle yaparız
$ kubectl get clusterpolicies require-base-image
NAME                 BACKGROUND     ACTION  READY
require-base-image   true           enforce true

4 Ağustos 2022 Perşembe

Container Runtime Tarihçesi ve Bileşenleri Nelerdir?

Container Runtime Tarihçesi
Açıklaması şöyle. Yani ilk başta farklı işletim sistemleri arasında uyumluluk probleminden dolayı, farklı Container Runtime gerçekleştirimleri ortaya çıktı. Bunlardan birisi de Rkt
Kubernetes originally leveraged Docker for running containers, it is still the default container runtime today. However, a few years ago CoreOS wanted to use kubernetes on Rkt. CoreOS offered a bunch of patches to kubernetes to use Rkt as an alternative to Docker.
Bir başka açıklama şöyle
However, before version 1.5, there were only two built-in container runtimes, Docker and rkt, which failed in meeting all users’ demands. For example, Kubernetes allocates CPU and memory resources for Linux machines’ apps using systemd and Cgroup. Then what about the Windows machines? Cgroup doesn’t work anymore, and a container runtime for Windows systems is needed. You were facing the same predicament in OS like Centos, macOS, Debian, etc.

Furthermore, the code by then obviously did not meet the Kubernetes’ principle of flexibility.
Bileşenler
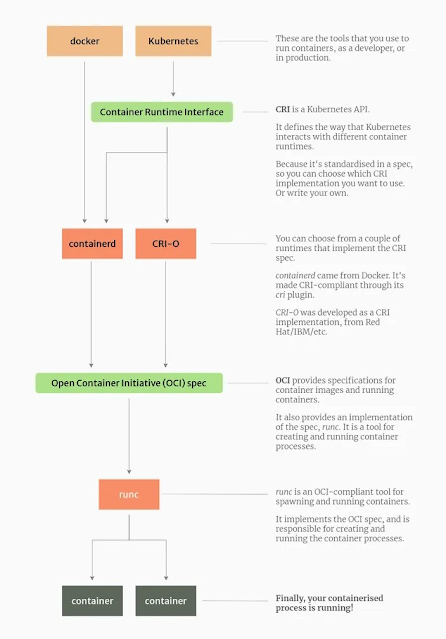
4 bileşen var.
1. High Level Container Runtime
2. Low-Level Container Runtime
3. Container Runtime Interface : Kubernetes ve High Level Runtime arasındaki arayüz
4. Open Container Interface : High Level Runtime ve Low-Level Container Runtime arasındaki arayüz

Tüm akışı örnekleyen bir şekil şöyle

1. High Level Container Runtime
High Level Container Runtime yazısına taşıdım

2. Low-Level Container Runtimes
2.1 Native runtimes : runC, crun gibi
2.2. Sandboxed and virtualized runtimes. gVisor, kata-containers gibi. Sanboxed runtime'lar biraz daha yavaş kalabilirler.

runc
runc yazısına taşıdım

3. Container Runtime Interface (CRI) Arayüzü Nedir
4. Open Container Interface Nedir?
Open Container Interface (OCI) Nedir Nedir yazısına taşıdım


Kubernetes kind: Cluster

Örnek Şöyle yaparız apiVersion: cluster.k8s.io/v1alpha1 kind: Cluster metadata: name: my-cluster spec: autoscaler: enabled: true ...