21 Kasım 2022 Pazartesi

Seccomp — Secure Computing Mode

Giriş
Bir JSON dosyası hazırlanır. İskeleti şöyle
{
    "defaultAction": "",
    "architectures": [],
    "syscalls": [
        {
            "names": [],
            "action": ""
        }
    ]
}
Açıklaması şöyle
In the syscalls section we will list the system calls under the "names"array that is allowed or blocked depending on what is being set as "action" .

In the architectures section we have to define what architectures we are targeting. This is very essential because the seccomp filter will operate at the kernel level. And also during the filtering, syscall IDs will be used and not the names we defined in syscalls.names section.

defaultAction defines what will happen if no matching system call is found inside the syscalls list.
1. Dosya Nereye Konulur
Açıklaması şöyle
In order to assign a seccomp profile to a pod we have to place the seccomp profile JSON file in the nodes directories so that kubelet can access that easily while scheduling the pod into the corresponding nodes.

As per the documentation version v1.25, the default root directory of the kubelet is : /var/lib/kubelet
2. Attach a seccompProfile into a pod
Açıklaması şöyle
To set the Seccomp profile to a pod/container, include the seccompProfile field in the securityContext section of the Pod or Container manifest.

There are various kinds of seccompProfile :

Localhost — a seccomp profile defined in a file on the node where the pod will be scheduled.

RuntimeDefault — the container runtime default profile should be used. 

Unconfined — no profile should be applied. (default, if no profile is defined)
Örnek
Şöyle yaparız
apiVersion: v1
kind: Pod
metadata:
  name: pod-1
  labels:
    app: pod-1
spec:
  securityContext:
    seccompProfile:
      type: Localhost
      localhostProfile: profiles/custom.json
  containers:
  - name: test-container
    image: hashicorp/http-echo:0.2.3
    args:
    - "-text=just made some syscalls!"
    securityContext:
      allowPrivilegeEscalation: false   
Açıklaması şöyle
To ensure the container does not get more privileges than the pod, we must set container allowPrivilegeEscalation to false.
Dosyayı şöyle yerleştiririz
# create new directory under kubelet root directory
$ mkdir -p /var/lib/kubelet/seccomp/profiles

# move "custom.json"
$ mv custom.json /var/lib/kubelet/seccomp/profiles/
3. Dosyanın İçi
defaultAction olarak 
SCMP_ACT_ERRNO (syscalls listesinde yoksa whitelist)
SCMP_ACT_ALLOW (syscalls listesinde yoksa blacklist)
SCMP_ACT_LOG  (sadece /var/log/syslog dosyasına logla, audit amaçlıdır)
verilebilir

Örnek - audit
Şöyle yaparız
{
    "defaultAction": "SCMP_ACT_LOG"
}
Örnek - whitelist
Şöyle yaparız
{
    "defaultAction": "SCMP_ACT_ERRNO",
    "architectures": [
        "SCMP_ARCH_X86_64",
        "SCMP_ARCH_X86",
        "SCMP_ARCH_X32"
    ],
    "syscalls": [
        {
            "names": [
                "pselect6",
                "getsockname",
                ..
                ..
                "execve",
                "exit"
            ],
            "action": "SCMP_ACT_ALLOW"
        }
    ]
}
Örnek - blacklist
Şöyle yaparız
{
    "defaultAction": "SCMP_ACT_ALLOW",
    "architectures": [
        "SCMP_ARCH_X86_64",
        "SCMP_ARCH_X86",
        "SCMP_ARCH_X32"
    ],
    "syscalls": [
        {
            "names": [
                "pselect6",
                "getsockname",
                ..
                .. 
                ..
                "execve",
                "exit"
            ],
            "action": "SCMP_ACT_ERRNO" 
        }
    ]
}


20 Kasım 2022 Pazar

kubectl describe ns seçeneği

Örnek
Açıklaması şöyle
Starting with v1.21 beta, the Kubernetes control plane will set an immutable label kubernetes.io/metadata.name on all namespaces, provided that the NamespaceDefaultLabelName feature gate is enabled. The value of the label is the namespace name.
Şöyle yaparız
>kubectl describe ns my-client-ns
Name:         my-client-ns
Labels:       app.kubernetes.io/name=my-deployment-basic
              kubernetes.io/metadata.name=my-client-ns
Annotations:  <none>
Status:       Activ

16 Kasım 2022 Çarşamba

Restart Kubernetes Pods

1. kubectl rollout restart
Açıklaması şöyle
This method is the recommended first port of call as it will not introduce downtime as pods will be functioning. A rollout restart will kill one pod at a time, then new pods will be scaled up. This method can be used as of K8S v1.15.
Şöyle yaparız. Kesinti (downtime) gerektirmez
kubectl rollout restart deployment <deployment_name> -n <namespace>
2. kubectl scale
Açıklaması şöyle
This method will introduce an outage and is not recommended. If downtime is not an issue, this method can be used as it can be a quicker alternative to the kubectl rollout restart method (your pod may have to run through a lengthy Continuous Integration / Continuous Deployment Process before it is redeployed).

If there is no YAML file associated with the deployment, you can set the number of replicas to 0.

This terminates the pods. Once scaling is complete the replicas can be scaled back up as needed (to at least 1)
Şöyle yaparız. Kesinti (downtime) gerektirir
kubectl scale deployment <deployment name> -n <namespace> --replicas=0

kubectl scale deployment <deployment name> -n <namespace> --replicas=3
3. kubectl delete pod and kubectl delete replicaset
Şöyle yaparız
kubectl delete pod <pod_name> -n <namespace>
or
kubectl delete pod -l “app:myapp” -n <namespace>
or
kubectl delete replicaset <name> -n <namespace>
4. kubectl get pod | kubectl replace
Açıklaması şöyle
The pod to be replaced can be retrieved using the kubectl get pod to get the YAML statement of the currently running pod and pass it to the kubectl replace command with the --force flag specified in order to achieve a restart. This is useful if there is no YAML file available and the pod is started.
Şöyle yaparız
kubectl get pod <pod_name> -n <namespace> -o yaml | kubectl replace --force -f -
5. kubectl set env
Açıklaması şöyle
Setting or changing an environment variable associated with the pod will cause it to restart to take the change. The example below sets the environment variable DEPLOY_DATE to the date specified, causing the pod to restart.
Şöyle yaparız
kubectl set env deployment <deployment name> -n <namespace> DEPLOY_DATE="$(date)"
6. kill the main process of a specific container
Açıklaması şöyle
This method will allow you to kill the main process of a specific container which will trigger a restart of that container without K8S killing the pod and recreating it.

This will send a SIGTERM signal to process 1, which is the main process running in the container. All other processes will be children of process 1, and will be terminated after process 1 exits. See the kill manpage for other signals you can send.
Şöyle yaparız
kubectl exec -it <pod_name> -c <container_name> --/bin/sh -c "kill 1"


Kubernetes kind: HorizontalPodAutoscaler - Custom Metrics

Giriş
Custom metrics için Prometheus ve prometheus-adapter kuruluyor. Açıklaması şöyle
In order to scale based on custom metrics we need to have two components:

- One that collects metrics from our applications and stores them to Prometheus time series database.
- The second one that extends the Kubernetes Custom Metrics API with the metrics supplied by a collector, the k8s-prometheus-adapter. This is an implementation of the custom metrics API that attempts to support arbitrary metrics.
Yani özel bir kurulum yapmak gerekiyor.

Custom Metric Değerlerini Görmek
Örnek
Şöyle yaparız
https://<apiserver_ip>/apis/custom-metrics.metrics.k8s.io/v1beta1\ /namespaces/default/pods/sample-metrics-app/http_requests
Açıklaması şöyle
So When you visit the above URL, the Custom Metrics API Server will go to Prometheus to query the value of the http_requests metric of the Pod named sample-metrics-app, and then return in a fixed format. And of course, the http_requests value is already collected by Prometheus.

Örnek
Şöyle yaparız. scaleTargetRef alanında Deployment ismi ve kaç tane pod istendiği belirtiliyor. İstenen sayı 3 -15 arasında. Daha sonra metric alanında Burada - type: Pods kullanılıyor ve metric belirtiliyor
apiVersion: autoscaling/v2beta1
kind: HorizontalPodAutoscaler
metadata:
  name: myapplication-hpa
spec:
  scaleTargetRef:
    apiVersion: apps/v1
    kind: Deployment
    name: myapplication-deployment
  minReplicas: 3
  maxReplicas: 15
  metrics:
  - type: Pods
    pods:
      metricName: myapplication_api_response_time_avg
      targetAverageValue: "500"
Örnek
Şöyle yaparız. Burada kaynak olarak service kullanılıyor.
apiVersion: autoscaling/v2beta1
kind: HorizontalPodAutoscaler

metadata:
  name: sample-metrics-app-hpa
spec:
  scaleTargetRef:
    apiVersion: apps/v1
    kind: Deployment
    name: sample-metrics-app
  minReplicas: 2
  maxReplicas: 10
  metrics:
  - type: Object
    object:
      target:
        kind: Service
        name: sample-metrics-app
      metricName: http_requests
      targetValue: 100
Şöyle yaparız
https://<apiserver_ip>/apis/custom-metrics.metrics.k8s.io/v1beta1\
/namespaces/default/services/sample-metrics-app/http_requests

Kubeadm komutu

Giriş
Açıklaması şöyle
Kubeadm is a tool designed to bootstrap a full-scale Kubernetes cluster. It takes care of all heavy lifting related to cluster provisioning and automates the process completely.

15 Kasım 2022 Salı

Kubernetes kind : CustomResourceDefinition

Giriş
CRD tanımlarken kind : X şeklindeki isim verilir. Daha sonra X için bir instance yaratırım.
Örnek
Şöyle yaparız
apiVersion: apiextensions.k8s.io/v1       #1
kind: CustomResourceDefinition
metadata:
 name: foos.frankel.ch                    #2
spec:
 group: frankel.ch                        #3
 names:
   plural: foos                           #4
   singular: foo                          #5
   kind: Foo                              #6
 scope: Namespaced                        #7
 versions:
   - name: v1alpha1
     served: true                         #8
     storage: true                        #9
     schema:
       openAPIV3Schema:
         type: object
         properties:
           spec:
             type: object
             properties:
               bar:
                 type: string
             required: ["bar"]
         required: ["spec"]
Açıklaması şöyle
1. Required header
2. Match the following <plural>.<group>
3. Group name for REST API — /apis/<group>/<version>
4. Plural name for the REST API — /apis/<group>/<version>/<plural>
5. Singular name to be used on the CLI and for display
6. Used in manifests
7. Can be either Cluster or Namespaced. A Cluster resource is declared cluster-wide, and there can be a single one per cluster; Namespaced resources can be multiple and need to be under a namespace; by default, default
8. A version can be enabled/disabled
9. The latest version must be marked as the storage version
Kullanmak için şöyle yaparız
apiVersion: foos.frankel.ch/v1alpha1
kind: Foo
metadata:
  name: myfoo
spec:
  bar: "whatever"
kubectl apply -f foo.yml
kubectl get foo
Örnek
Şöyle yaparız
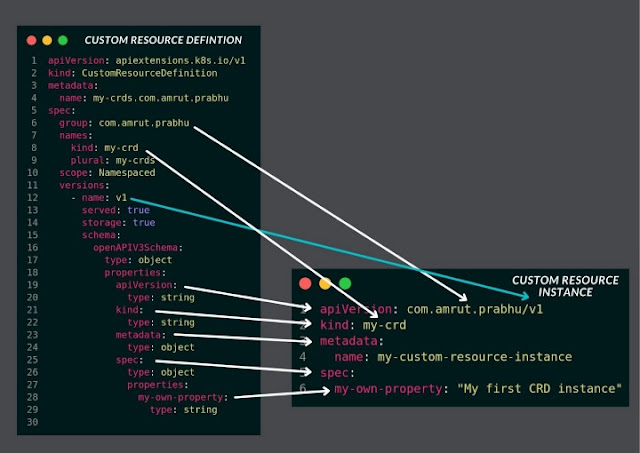
apiVersion: apiextensions.k8s.io/v1 kind: CustomResourceDefinition # Define the metadata and definition of the CRD metadata: name: my-crds.com.amrut.prabhu spec: group: com.amrut.prabhu names: kind: my-crd plural: my-crds scope: Namespaced versions: - name: v1 served: true storage: true # Define the schema of the CRD instances that we will create later. schema: openAPIV3Schema: type: object properties: apiVersion: type: string kind: type: string metadata: type: object spec: type: object properties: my-own-property: type: string
Metadata kısmı için açıklama şöyle
Here we define the “Kind” of our resource, i.e we want to create a CRD and we provide it a name. The name has to be of the format <CRD plural Name>.<Group name> , ie. “my-crds . com.amrut.prabhu ”. Next, in the spec section, we define the name and the plural name of the kind we are creating. This is the type we will specify while creating a new instance later.

Next, we define that the CRD will be scoped to a namespace and in the version section, we specify the version of this CRD to v1. When we want to create a new version of this definition, we will just bump up this version number.

Lastly, we have served property that defines if this CRD is enabled to be used in the cluster and storage refers to if this version of the CRD will be stored. At a time you can have only one version of the CRD that can be stored.
spec için açıklama şöyle
In this, we define the schema using the Open API version 3 standards. We specify the top level as an object which has some properties.

Now, some of the absolutely required properties are:
- apiVersion: To define the version of the CRD we will be using.
- kind: The type of the CRD
metadata: The metadata which will be added such as the name, annotations, etc. This will be of the type Object.
- spec: This defines the custom specifications properties you want to provide.

Now, in the above schema, I have specified only one property i.e my-own-property in the spec section. You can also define a property of type object having its own properties.
Eğer bu CRD için bir instance yaratmak istersek şöyle yaparız
apiVersion: com.amrut.prabhu/v1
kind: my-crd
metadata:
  name: my-custom-resource-instance
spec:
  my-own-property: "My first CRD instance"
Şeklen şöyle

Kubernetes kind: Pod nodeAffinity

Giriş
nodeAffinity olarak şunlar kullanılabilir
- requiredDuringSchedulingIgnoreDuringExecution
- preferredDuringSchedulingIgnoreDuringExecution

Şeklen şöyle

Planlanan Yeni nodeAffinity Tipleri
Şunlar planlanıyor
- requiredDuringSchedulingRequiredDuringExecution
- preferredDuringSchedulingRequiredDuringExecution

Execution ile eğer çalışma esnasında bir label kaldırılırsa veya değiştirilirse kastediliyor
Şeklen şöyle

Operator Tipleri
operator olarak şunlar kullanılabilir
-  In
-  NotIn
-  Exists

1. requiredDuringSchedulingIgnoreDuringExecution
Pod mutlaka belirtilen worker üzerinde çalışmalıdır


Örnek - In
Şöyle yaparız
kubectl label nodes node-01 size=large
Şeklen şöyle

Şöyle yaparız. Burada label olarak Large, Medium olan worker tercih ediliyor.
apiVersion: v1
kind: Pod
metadata:
 name: dbapp
spec:
 containers:
 - name: dbapp
   image: db-processor
 affinity:
  nodeAffinity:
    requiredDuringSchedulingIgnoredDuringExecution
      nodeSelectorTerms:
      - matchExpresions:
        - key: Size
          operator: In
          values:
          - Large
          - Medium
Örnek - In
Şöyle yaparız. Burada label olarak e2e-az1, e2e-az2 ve custom-value olan worker tercih ediliyor.
apiVersion: v1
kind: Pod
metadata:
  name: with-node-affinity
spec:
  affinity:
    nodeAffinity:
      requiredDuringSchedulingIgnoredDuringExecution:
        nodeSelectorTerms:
        - matchExpressions:
          - key: kubernetes.io/e2e-az-name
            operator: In
            values:
            - e2e-az1
            - e2e-az2
      preferredDuringSchedulingIgnoredDuringExecution:
      - weight: 1
        preference:
          matchExpressions:
          - key: custom-key
            operator: In
            values:
            - custom-value
  containers:
  - name: with-node-affinity
    image: k8s.gcr.io/pause:2.0
Örnek - NotIn
Şöyle yaparız
affinity:
  nodeAffinity:
    requiredDuringSchedulingIgnoredDuringExecution
      nodeSelectorTerms:
      - matchExpresions:
        - key: Size
          operator: NotIn
          values:
          - Small
Örnek - Exists
Şöyle yaparız. Burada operator için "values" tanımlanmıyor. Sadece "Size" isimli bir label olması yeterli
affinity:
  nodeAffinity:
    requiredDuringSchedulingIgnoredDuringExecution
      nodeSelectorTerms:
      - matchExpresions:
        - key: Size
          operator: Exist
2. preferredDuringSchedulingIgnoreDuringExecution Kullanımı
Pod belirtilen worker üzerine atanmaya çalışılır. Eğer olmuyorsa herhangi başka bir worker'a atanır

Kubernetes Scheduler

Giriş
Açıklaması şöyle. Yeni bir pod'un hangi worker üzerinde çalışacağına karar verir. Buradaki esas nokta sadece karar vermesi
The scheduler here will intelligently decide on which worker node this pod should be placed.
Şeklen şöyle
Açıklaması şöyle
As you see in the diagram, we have an API server, scheduler, controller, and database. When we use the command kubectl to create a resource, we are actually talking to the API server and the API server merely stores the resource in the database. Now, we have a scheduler, which keeps on asking the API server if there are some resources created.

Once the scheduler finds that a pod has to be created, it then inserts into the database via the API server the reference of the node where the pod will be created.

Next, Kubelets running on the various worker nodes start calling the API server and check if any pods have to be created on that particular node. Kubelets are nothing but controllers themselves.

Kendimiz Schedule Etmek İstersek - Manual Scheduling
Açıklaması şöyle
Every POD has a field called nodeName that by default is not set and kube-scheduler sets it on its own. So if one needs to manually schedule a pod, then they just need to set the nodeName property in the pod definition file under the spec section.


**Note: Above method only works when pod is still not created. If the pod is created and already running, then this method won’t work.
Örnek
Açıklaması şöyle
Below is the example of a Pod configuration file, in a scenario where the Pod needs to be manually scheduled on node named “node02”

Whenever the user specify the nodeName property in the Pod’s configuration file. The kube-scheduler detects it and instead of on its own scheduling the Pod, it takes the user choice and schedules the Pod in that specified node. Simple :))
Şöyle yaparız
apiVersion: v1
kind: Pod
metadata:
 name: nginx
 labels:
  name: nginx
spec:
 containers:
 - name: nginx
   image: nginx
   ports:
   - containerPort: 8080
 nodeName: node02


11 Kasım 2022 Cuma

Init Containers

Giriş
Şeklen şöyle
Açıklaması şöyle. Pod içinde birden fazla Init Container olabilir. Hepsi sırayla çalışırlar. 
Pods can have one or more Init containers which run before the application containers are started.

- Init containers contain utilities or setup scripts not present in application image. Init containers always runs to completion
- Each Init container must complete successfully before next one starts
- Because Init containers runs to completion before any application container starts, Init containers offers the mechanism to block or delay the application container start-up until a set of preconditions are met. - Once the preconditions are met, all the application containers can start in parallel.
Kullanım Örnekler
Bazı örnekler şöyle
Here are some scenarios for how to use Init containers,

- Clone a Git repository into a Volume
- Wait for sometime before starting the app container with a command like sleep 60
- Place values into a configuration file and run a template tool to dynamically generate a configuration file for the main app container. For example, place the POD_IP value in a configuration and generate the main app configuration file
1. spec bölümü altında initContainers tanımlanır
2. Her init container'a bir isim, bir image ve çalıştıracağı komut tanımlanır. Image olarak
- alpine/git
-  busybox:1.28
vs kullanılabilir

Örnek
Şöyle yaparız
apiVersion: v1
kind: Pod
metadata:
  name: myapp-pod
  labels:
    app.kubernetes.io/name: MyApp
spec:
  containers:
    - name : myapp-container
      image: busybox:1.28
      command: ['sh', '-c', 'echo Running! && sleep 3600']
  initContainers:
    - name : init-myservice
      image: busybox:1.28
      command: ['sh', '-c', 'until nslookup myservice.$(cat /var/run/secrets/kubernetes.io/serviceaccount/namespace).svc.cluster.local; do echo waiting; sleep 2; done']
    - name : init-mydb
      image: busybox:1.28
      command: ['sh', '-c', 'until nslookup mydb.$(cat /var/run/secrets/kubernetes.io/serviceaccount/namespace).svc.cluster.local; do echo waiting; sleep 2; done']
Açıklaması şöyle
This example defines a simple Pod that has two init containers. The first waits for myservice, and the second waits for mydb. Once both init containers complete, the Pod runs the app container from its spec section.
Örnek
Şöyle yaparız. Burada git clone komutu çalıştırılıyor ve pod üzerindeki bir volume'a indiriliyor.
#Pod with Init-container using emptyDir volume
apiVersion: v1
kind: Pod
metadata:
  labels:
    run: webserver
  name: webserver
spec:
  containers:
  - image: nginx
    name: nginx-webserver
    volumeMounts:
    - name: web-data
      mountPath: /usr/share/nginx/html
  initContainers:
  - image: alpine/git
    name: git
    command:
    - git
    - clone
    - https://github.com/shamimice03/demo-init-container.git
    - /temp-repo
    volumeMounts:
    - name: web-data
      mountPath: /temp-repo
  volumes:
  - name: web-data
    emptyDir: {}
Şöyle yaparız. Burada git clone komutu çalıştırılıyor ve host üzerindeki bir dizine indiriliyor.
#Pod with Init-container using hostPath volume
apiVersion: v1
kind: Pod
metadata:
  labels:
    run: webserver
  name: webserver
spec:
  containers:
  - image: nginx
    name: nginx-webserver
    volumeMounts:
    - name: web-data
      mountPath: /usr/share/nginx/html
  initContainers:
  - image: alpine/git
    name: git
    command:
    - git
    - clone
    - https://github.com/shamimice03/demo-init-container.git
    - /temp-repo
    volumeMounts:
    - name: web-data
      mountPath: /temp-repo
  volumes:
  - name: web-data
    hostPath:
      path: /root/web
      type: DirectoryOrCreate

10 Kasım 2022 Perşembe

Helm - Range - For veya Foreach Gibidir

Giriş
Açıklaması şöyle
range is as similar to for/foreach loops, like other programming languages. In Helm’s template language, the way to iterate through a collection is to use the range operator.
Örnek
values.yaml şöyle olsun
configMap:
  data:
    env: test
    platfrom:
     - java
     - python
     - golang
Şöyle yaparız
apiVersion: v1
kind: ConfigMap
metadata:
  name: {{ .Release.Name }}-configmap
data: 
  env: {{ .Values.configMap.data.env }}
  platfrom: |
  {{- range .Values.configMap.data.platfrom }} 
   - {{ . | title | quote }} 
  {{- end }}
Çıktısı şöyledir
>> helm template ~/webserver
---
# Source: webserver/templates/test.yaml
apiVersion: v1
kind: ConfigMap
metadata:
  name: release-name-configmap
data: 
  env: test 
  platfrom: |
   - "Java" 
   - "Python" 
   - "Golang"

Örnek
Şöyle yaparız. {{ toYaml ($.Values.vtgate.resources) | indent 10 }} ile values.yaml dosyasındaki blok aynen kopyalanır
{{ range $cell := $.Values.availabilityZones }}
    - name: {{ $cell }}
      gateway:
        authentication:
          static:
            secret:
              name: {{ $.Values.keyspaceName }}
              key: users.json
        replicas: {{ $.Values.vtgate.replicas }}
        extraFlags:
          mysql_server_version: "8.0.13-Vitess"
        resources:
{{ toYaml ($.Values.vtgate.resources) | indent 10 }}

{{end}}
Örnek
Şöyle yaparız. Burada $. ile başlamıyor. Üzerinde yürünen blok için bilgi çekiliyor.
{{- range .Values.proc.imgw }}
{{- if and (not .podSpecific) (eq .protocol "TCP") }}
    - name: {{ .name }}
      protocol: {{ .protocol }}
      port: {{ .containerPort }}
      nodePort: {{ add $root.Values.farm_offset .nodePort }}
      targetPort: {{ .containerPort }}
{{- end }}
values.yaml şöyledir
proc:
  ...
  imgw:
    - containerPort: 12340
      name: rlwy-proc-imgw1
      protocol: TCP
      nodePort: 30092
    - containerPort: 12341
      name: rlwy-proc-imgw2
      protocol: TCP
      nodePort: 30093
    - containerPort: 12342
      name: rlwy-proc-imgw3
      protocol: TCP
      nodePort: 30094
    - containerPort: 12343
      name: rlwy-proc-imgw4
      protocol: TCP
      nodePort: 30095

Helm - Modifying Scope Using “with”

Örnek - Modifying scope using “with”
Söz dizimi şöyle
{{ with PIPELINE }}
  
  {{- toYaml . | nindent 2 }}
{{ end }}
values.yaml şöyle olsun
configMap:
  data:
    env: test
    platfrom:
     - java
     - python
     - golang
Şöyle yaparız
apiVersion: v1
kind: ConfigMap
metadata:
  name: {{ .Release.Name }}-configmap
data: 
  env: {{ .Values.configMap.data.env }}
  {{- with .Values.configMap.data.platfrom }} 
  platfrom: {{- toYaml . | nindent 2 | upper  }} 
  {{- end }}
Çıktısı şöyle
>> helm template ~/webserver
---
# Source: webserver/templates/configmap.yaml
apiVersion: v1
kind: ConfigMap
metadata:
  name: release-name-configmap
data: 
  env: test 
  platfrom:
  - JAVA
  - PYTHON
  - GOLANG
Örnek
values.yaml şöyle olsun
configMap:
  data:
    env: test
    platfrom:
     - java
     - python
     - golang
    conf:
      os: linux
      database: mongo
Şöyle yaparız
apiVersion: v1
kind: ConfigMap
metadata:
  name: {{ .Release.Name }}-configmap
data: 
  env: {{ .Values.configMap.data.env }}
  {{- with .Values.configMap.data.platfrom }} 
  platfrom: {{- toYaml . | nindent 2 | upper  }} 
  {{- end }}
  {{- with .Values.configMap.data.conf }}
  operating-system: {{ .os }}
  database-name: {{ .database }}
  {{- end }} 
Çıktısı şöyle
>> helm template ~/webserver
# Source: webserver/templates/configmap.yaml
apiVersion: v1
kind: ConfigMap
metadata:
  name: release-name-configmap
data: 
  env: test 
  platfrom:
  - JAVA
  - PYTHON
  - GOLANG
  operating-system: linux
  database-name: mongo
Örnek - Root Scope
Açıklaması şöyle
As we discussed earlier, within a with block .referred to a particular object. But there may be cases where we might have a requirement to access root objects or other objects, which are not a part of the current scope.
Şu kod hata verir
{{- with .Values.configMap.data.conf }}
  operating-system: {{ .os }}
  database-name: {{ .database }}
  k8s-namespace: {{ .Release.Namespace }}
{{- end }}

Error: template: webserver/templates/configmap.yaml:14:28: 
executing "webserver/templates/configmap.yaml" at 
<.Release.Namespace>: nil pointer evaluating interface {}.Namespace
Root scope olduğunu belirtmek için $ karakteri kullanılır. Şöyle yaparız
{{- with .Values.configMap.data.conf }}
  operating-system: {{ .os }}
  database-name: {{ .database }}
  k8s-namespace: {{ $.Release.Namespace }}
{{- end }}


Helm - Flow Control If/Else

Giriş
Söz dizimi şöyle
{{ if PIPELINE }}
  # Do something
{{ else if OTHER PIPELINE }}
  # Do something else
{{ else }}
  # Default case
{{ end }}
Açıklaması şöyle
A pipeline will be evaluated as false if the value is:

a boolean false
a numeric zero
an empty string
a nil (empty or null)
an empty collection (map, slice, tuple, dict, array)
Açıklaması şöyle
To remove any leading spaces we can use a dash {{- before the if/else statement.
Örnek
Şöyle yaparız
{{- if .Values.backup.enabled }}
  backup:
    engine: {{ $.Values.backup.engine }}
    locations:
      - volume:
          persistentVolumeClaim:
            claimName: {{ $.Values.keyspaceName }}-vitess-backup
{{- end }}
Örnek -and
Şöyle yaparız
{{- if and (.Values.configMap.data.darkMode) ( eq .Values.configMap.data.os "mac") }}
mode: dark
{{- else }} 
mode: light
{{- end }}
{{- if eq .Values.configMap.data.env "prod"  }}
env: prod
{{- else if eq .Values.configMap.data.env "dev" }}
env: dev
{{- else }}
env: test
{{- end }}

9 Kasım 2022 Çarşamba

helm install seçeneği - Install A Chart

Giriş
Söz dizimi şöyle
helm install [NAME] [CHART] [flags]
Örnek
Şöyle yaparız
$ helm install elastic-operator elastic/eck-operator -n elastic-system --create-namespace
-- debug Seçeneği - Detaylı Çıktı Gösterir
Açıklaması şöyle
It enables the verbose output when the helm command runs.
Örnek - debug
Şöyle yaparız
$ helm install elastic-operator elastic/eck-operator -n elastic-system 
  --create-namespace --debug
-- dry-run Seçeneği
Açıklaması şöyle
Helm comes up with the dry run option for debugging. Use this option when you don’t want to install the chart but want to validate and debug only against the Kubernetes cluster. It is similar to kubectl dry-run option. It will validate the Chart deployment against the K8s cluster by loading the data into it.
Örnek 
Şöyle yaparız
$ helm install elastic-operator elastic/eck-operator -n elastic-system 
  --create-namespace --values custom.yaml --dry-run
Örnek 
Şöyle yaparız. Bize tüm yaml'ları gösterir.
$helm install sample-service ./sample-service --dry-run --debug
install.go:149: [debug] Original chart version: "" install.go:166: [debug] CHART PATH: /Users/...../k8s-helm-sample-service/helm/sample-service NAME: sample-service LAST DEPLOYED: Tue Nov 9 16:49:53 2021 NAMESPACE: default STATUS: pending-install REVISION: 1 USER-SUPPLIED VALUES: {} COMPUTED VALUES: affinity: {} fullnameOverride: "" image: pullPolicy: IfNotPresent repository: sample-service imagePullSecrets: [] ingress: annotations: {} enabled: false hosts: - host: chart-example.local paths: [] tls: [] nameOverride: "" nodeSelector: {} podSecurityContext: {} replicaCount: 1 resources: {} securityContext: {} service: port: 80 type: ClusterIP serviceAccount: annotations: {} create: true name: null tolerations: [] HOOKS: --- # Source: sample-service/templates/tests/test-connection.yaml apiVersion: v1 kind: Pod metadata: name: "sample-service-1636505393-test-connection" labels: helm.sh/chart: sample-service-0.1.0 app.kubernetes.io/name: sample-service app.kubernetes.io/instance: sample-service-1636505393 app.kubernetes.io/version: "1.16.0" app.kubernetes.io/managed-by: Helm annotations: "helm.sh/hook": test-success spec: containers: - name: wget image: busybox command: ['wget'] args: ['sample-service-1636505393:80'] restartPolicy: Never MANIFEST: --- # Source: sample-service/templates/serviceaccount.yaml apiVersion: v1 kind: ServiceAccount metadata: name: sample-service-1636505393 labels: helm.sh/chart: sample-service-0.1.0 app.kubernetes.io/name: sample-service app.kubernetes.io/instance: sample-service-1636505393 app.kubernetes.io/version: "1.16.0" app.kubernetes.io/managed-by: Helm --- # Source: sample-service/templates/service.yaml apiVersion: v1 kind: Service metadata: name: sample-service-1636505393 labels: helm.sh/chart: sample-service-0.1.0 app.kubernetes.io/name: sample-service app.kubernetes.io/instance: sample-service-1636505393 app.kubernetes.io/version: "1.16.0" app.kubernetes.io/managed-by: Helm spec: type: ClusterIP ports: - port: 80 targetPort: http protocol: TCP name: http selector: app.kubernetes.io/name: sample-service app.kubernetes.io/instance: sample-service-1636505393 --- # Source: sample-service/templates/deployment.yaml apiVersion: apps/v1 kind: Deployment metadata: name: sample-service-1636505393 labels: helm.sh/chart: sample-service-0.1.0 app.kubernetes.io/name: sample-service app.kubernetes.io/instance: sample-service-1636505393 app.kubernetes.io/version: "1.16.0" app.kubernetes.io/managed-by: Helm spec: replicas: 1 selector: matchLabels: app.kubernetes.io/name: sample-service app.kubernetes.io/instance: sample-service-1636505393 template: metadata: labels: app.kubernetes.io/name: sample-service app.kubernetes.io/instance: sample-service-1636505393 spec: serviceAccountName: sample-service-1636505393 securityContext: {} containers: - name: sample-service securityContext: {} image: "sample-service:1.16.0" imagePullPolicy: IfNotPresent ports: - name: http containerPort: 80 protocol: TCP livenessProbe: httpGet: path: / port: http readinessProbe: httpGet: path: / port: http resources: {}
--set seçeneği
Örnek
Şöyle yaparız
helm install apisix apisix/apisix \
  --namespace ingress-apisix \
  --create-namespace \
  --devel \                              
  --set gateway.type=NodePort \                        
  --set gateway.http.nodePort=30800 \
  --set ingress-controller.enabled=true \
  --set ingress-controller.config.kubernetes.enableApiGateway=true \
  --set ingressPublishService="ingress-apisix/apisix-gateway"
--values seçeneği
Örnek
Şöyle yaparız
helm install jenkins jenkinsci/jenkins 
  --values jenkins.yaml -n jenkins --create-namespace

Kubernetes kind: Cluster

Örnek Şöyle yaparız apiVersion: cluster.k8s.io/v1alpha1 kind: Cluster metadata: name: my-cluster spec: autoscaler: enabled: true ...