31 Ekim 2022 Pazartesi

Kubernetes Worker - Kubelet

Kubelet Nedir?
Açıklaması şöyle. Yani worker node'u yöneten şeydir.
Node üzerindeki ana kubernetes ajanıdır.API server’dan gelecek isteklere karşı API Server’ı izler. İlgili docker servisi ile konuşarak Pod’u ayağa kaldırır ve bunun bilgisini API Server’a iletir.
Açıklaması şöyle
An agent that runs on each node in the cluster. It makes sure that containers are running in a Pod.

The kubelet takes a set of PodSpecs that are provided through various mechanisms and ensures that the containers described in those PodSpecs are running and healthy. The kubelet doesn’t manage containers which were not created by Kubernetes.
Açıklaması şöyle. Kubelet ortam değişkenleri yaratır.
Discovering Service
Kubernetes supports two modes to locate the Service — Environment Variables and DNS.

Using Environment Variables: When a pod is run on a node, the kubelet (controller component on the node) adds a set of environment variables for each service. For example, the service — shopping-cart, can produce the following environment variables —

SHOPPINGCART_MASTER_SERVICE_HOST=10.0.0.12
SHOPPINGCART_MASTER_SERVICE_PORT=6480
SHOPPINGCART_MASTER_PORT=tcp://10.0.0.12:6480
...
The pods of client APIs can use these environment variables to access the Kubernetes service.
Kubelet İçin Ayrılan Kaynak
Worker node üzerindeki kaynakların bölümlemesi şöyle

Eğer buna yüzde olarak bakarsak her bulut sağlayıcısının kullandığı yüzde farklı farklı. Açıklaması şöyle

İşlemci
Açıklaması şöyle
Every cloud provider has its way of defining limits, but for the CPU, they seem to all agree on the following values:

- 6% of the first core.
- 1% of the next core (up to 2 cores).
- 0.5% of the next 2 cores (up to 4 cores).
- 0.25% of any cores above four cores.
As for the memory limits, this varies a lot between providers.
Bellek
Açıklaması şöyle
As for the memory limits, this varies a lot between providers.


Helm Named Templates

Giriş
templates dizinined "_" underscore karakteri ile başlayan bir dosyaya yazılır. Named template iki şekilde kendi dosyamıza dahil edilebilir
1. template
2. include

Named Templates define satırı ile başlar ve end satırı ile biter
Örnek
Şöyle yaparız
# filename:  _helpers.tpl
{{/*
Common labels
*/}}
{{- define "webserver.labels" -}}
    app: nginx
    generator: helm
{{- end }}
template kullanımı - Tercih Etmeyin 
template içinde 
1. scope kullanamayız
2. template'ı pipeline ile kullanamayız

Örnek
Şöyle yaparız
apiVersion: apps/v1
kind: Deployment
metadata:
  name: webserver-deployment
  labels:
  {{- template "webserver.labels" }}
include kullanımı - Tercih Edin
Örnek
Şöyle yaparız
{{- include "webserver.labels" . | nindent 4 | qoute }}
Örnek
Elimizde şöyle iki template olsun
{{/*
Common labels
*/}}
{{- define "webserver.labels" -}}
{{- include "webserver.selectorLabels" . }}
app.kubernetes.io/managed-by: {{ .Release.Service }}
{{- end }}
{{/*
Selector labels
*/}}
{{- define "webserver.selectorLabels" -}}
app: {{ .Chart.Name }}
{{- end }}
Kullanmak için şöyle yaparız
apiVersion: apps/v1
kind: Deployment
metadata:
  name: {{ .Chart.Name }}
  labels:
  {{- include "webserver.labels" . | nindent 4 }}
spec:
  replicas: 3
  selector:
    matchLabels:
    {{- include "webserver.selectorLabels" . | nindent 6 }}
  template:
    metadata:
      labels:
      {{- include "webserver.selectorLabels" . | nindent 8 }}
    spec:
      containers:
      - name: {{ .Chart.Name }}
        image: nginx:latest
        ports:
        - containerPort: 80
Çıktıyı görmek için helm template komutunu çalıştırırız. Çıktı şöyledir
>> helm template ~/webserver
---------------------------------------------
# Source: webserver/templates/deployment.yaml
apiVersion: apps/v1
kind: Deployment
metadata:
  name: webserver
  labels:
    app: webserver
    app.kubernetes.io/managed-by: Helm
spec:
  replicas: 3
  selector:
    matchLabels:
      app: webserver
  template:
    metadata:
      labels:
        app: webserver
    spec:
      containers:
      - name: webserver
        image: nginx:latest
        ports:
        - containerPort: 80


30 Ekim 2022 Pazar

Common Pods Errors

Giriş
İki çeşit hata kodu var
1. Startup errors
2. Runtime errors

1. Startup errors
Startup errors yazısına taşıdım

 2. Runtime errors
Açıklaması şöyle
1. CrashLoopBackOff
2. RunContainerError
3. KillContainerError
4. VerifyNonRootError
5. RunInitContainerError
6. CreatePodSandboxError
7. ConfigPodSandboxError
8. KillPodSandboxError
9. SetupNetworkError
10. TeardownNetworkError
CrashLoopBackOff
CrashLoopBackOff yazısına taşıdım

RunContainerError
Açıklaması şöyle
The error appears when the container is unable to start. That’s even before the application inside the container starts.

The issue is usually due to misconfiguration such as:

1. Mounting a not-existent volume such as ConfigMap or Secrets.
2. Mounting a read-only volume as read-write.

You should use kubectl describe pod <pod-name> to inspect and analyse the errors.

28 Ekim 2022 Cuma

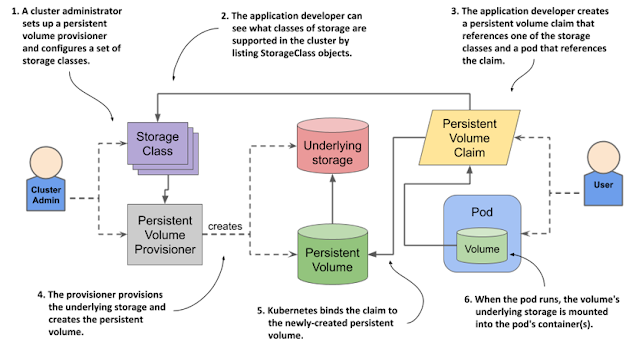
Kubernetes kind : PersistentVolumeClaim - Dynamic Provisioning

Giriş
1. Dynamic Provisioning kullanıyorsak artık bir PV yaratmaya gerek yok. Bu otomatik olarak yaratılacak. 
2. Ancak yine de çoğu projede bir PV yaratılıyor fakat storageClassName ile Dynamic Provisioning istendiği belirtiliyor.

Şeklen şöyle

Static Provisioning vs Dynamic Provisioning
Farkı şeklen şöyle
İlk örnekte PV hostPath ile yaratılıyor. PVC storage ve accessMode alanları ile PV'ye eşleştiriliyor. Pod claimName ile PVC'ye eşleşiyor.
İkinci örnekte PV yaratmaya gerek yok. SC yaratılıyor. PVC storageClassname ile SC ile eşleşiyor. Pod claimName ile PVC'ye eşleşiyor.


LifeCycle of Dynamically Provisioned Persistent Volumes
Açıklaması şöyle. Yani claim silinmediği müddetçe veri durur.
A new PersistentVolume object is created for each claim, which means that the cluster can never run out of them. Obviously, the datacentre itself can run out of available disk space, but at least there is no need for the administrator to keep recycling old PersistentVolume objects.
Örnek - PersistentVolume + storageClassName
Şöyle yaparız
apiVersion: v1
kind: PersistentVolume
metadata:
  name: mysql-pv-volume
  namespace: springboot-project
  labels:
    type: local
spec:
  storageClassName: manual
  capacity:
    storage: 20Gi
  accessModes:
    - ReadWriteOnce
  hostPath:
    path: "/mnt/data"
---
apiVersion: v1
kind: PersistentVolumeClaim
metadata:
  name: mysql-pv-claim
  namespace: springboot-project
spec:
  storageClassName: manual
  accessModes:
    - ReadWriteOnce
  resources:
    requests:
      storage: 20Gi
Örnek - PersistentVolume + storageClassName
Şöyle yaparız
apiVersion: storage.k8s.io/v1
kind: StorageClass
metadata:
  name: gp2-encrypted
  annotations: 
    # Make this storageClass as Default
    storageclass.kubernetes.io/is-default-class: "true"   
provisioner: ebs.csi.aws.com   # Amazon EBS CSI driver
parameters:
  type: gp2
  encrypted: 'true'   # EBS volumes will always be encrypted by default
volumeBindingMode: WaitForFirstConsumer
reclaimPolicy: Delete
mountOptions:
- debug
Sonra şöyle yaparız
---
#PVC definition

apiVersion: v1
kind: PersistentVolumeClaim
metadata:
  name: ebs-claim-01
spec:
  storageClassName: gp2-encrypted 
  accessModes:
    - ReadWriteOnce
  resources:
    requests:
      storage: 10Gi
 
---
#Pod definition with PVC as a Volume

apiVersion: v1
kind: Pod
metadata:
  name: webserver
spec:
  containers:
    - name: nginx-container
      image: nginx:latest
      volumeMounts:
      - mountPath: "/usr/share/nginx/html"
        name: test-volume
  volumes:
    - name: test-volume
      persistentVolumeClaim:
        claimName: ebs-claim-01

storageClassName İsimleri
Açıklaması şöyle
Another great thing about storage classes is that claims refer to them by name. If the storage classes are named appropriately, such as standard, fast, and so on, the persistent volume claim manifests are portable across different clusters.
Örnek - GCP standard
Şöyle yaparız
apiVersion: v1
kind: PersistentVolumeClaim
metadata:
  name: pvc-demo
spec:
  accessModes:
    - ReadWriteOnce
  resources:
    requests:
      storage: 30Gi
  storageClassName: standard-rwo

Pod İçin hostPath Volume - Single Node İçindir, Host Bilgisayarın Diskindeki Bir Dizini Pod Kullanabilir

Giriş
Host bilgisayarın diskindeki bir dizini pod kullanabilir. Açıklaması şöyle. Yani sadece single node cluster için işe yarar. Örneğin minikube sadece hostPath destekler
A hostPath volume mounts a file or directory from the host node's filesystem into your Pod. So, if you have a multi-node cluster, the pod is restarted for some reasons and assigned to another node, the new node won't have the old data on the same path. That's why we have seen, that hostPath volumes work well only on single-node clusters.
Kullanım
1. volumes ile host bilgisayar üzerindeki dizin belirtilir.
2. Pod bu bu volume'u volumeMounts kullanır

Örnek
Şekle şöyle

Örnek
Şöyle yaparız
apiVersion: v1
kind: Pod
metadata:
  name: myapp
spec:
  containers:
    - name: myapp-container
      image: myapp-image
      volumeMounts:
        - name: data-volume
          mountPath: /data
  volumes:
    - name: data-volume
      hostPath:
        path: /mnt/data
Örnek - DirectoryOrCreate
Şeklen şöyle
Açıklaması şöyle
Mount a directory /var/local/data as a volume from the host machine to /usr/share/nginx/html location of the nginx container of a pod.

Any data written by the nginx-container at /usr/share/nginx/html location will be persisted at /var/local/data location of the host machine. If the pod terminates, data will remain safe at /var/local/data location.
Şöyle yaparız
#pod definition file with a volume 
apiVersion: v1
kind: Pod
metadata:
  name: webserver
spec:
  containers:
  - image: nginx:latest
    name: nginx-container
    volumeMounts:
    - mountPath: /usr/share/nginx/html
      name: test-vol
  volumes:
  - name: test-vol
    hostPath:
      path: /var/local/data
      type: DirectoryOrCreate
Örnek
Şöyle yaparız
apiVersion: v1
kind: Pod
metadata:
  name: test-pd
spec:
  containers:
  - image: k8s.gcr.io/test-webserver
    name: test-container
    volumeMounts:
    - mountPath: /test-pd
      name: test-volume
  volumes:
  - name: test-volume
    hostPath:
      # directory location on host
      path: /data
      # this field is optional
      type: Directory

22 Ekim 2022 Cumartesi

kubectl patch seçeneği

Örnek
Şöyle yaparız. Burada  bir servisin selector alanı değiştiriliyor
kubectl patch service my-app -p '{"spec":{"selector":{"version":"v2.0.0"}}}'

kubectl run seçeneği

--image seçeneği
Örnek
Şöyle yaparız
$kubectl run multithreading-docker-pod\
          --image=multithreading-docker:latest\
          --image-pull-policy=Never\
          pod/multithreading-docker-pod
--limits seçeneği
Örnek
Şöyle yaparız
$kubectl run multithreading-docker-pod\
--image=multithreading-docker:latest\ --image-pull-policy=Never\ --limits="cpu=4"\ pod/multithreading-docker-pod

minikube docker-env seçeneği - Minikube Yerel Docker Registry'i Kullanır

Giriş
minikube image'ı Docker Hub'dan çekmeye çalışır, ancak bu durumda kendi bilgisayarımızdaki docker image'lerine erişemez. 

Örnek
Yerel docker registry'den image çekmesi için şöyle yaparız
eval $(minikube docker-env)
Örnek
Açıklaması şöyle
Because in this example we will create a pod from a locally built image the Minikube will throw an error on the pod creation because the locally built image won't be on the Docker Hub. Of course, you could upload the image to a Docker Hub, but for this example, I won't do it, to keep it simple. So just run the command :

$eval $(minikube docker-env)
Then we have to build the image again for the Minikube environment by executing the command:

$docker image build -t multithreading-docker .

Now we can run the pod with the following command:

$kubectl run multithreading-docker-pod\
          --image=multithreading-docker:latest\
          --image-pull-policy=Never\
          pod/multithreading-docker-pod


17 Ekim 2022 Pazartesi

Kubernetes kind : Deployment Strategy RollingUpdate

Giriş
Açıklaması şöyle. Yani geriye uyumluluk vardır ve hizmette kesinti olmaz.
1. In this strategy, we do not drop all the already running instances.
2. We drop instances by a certain percentage at a time and simultaneously spawn equal percentage of newer version pods.
3. This upgrade is the default strategy in K8s.
4. This has no downtime.
Örnek
Şöyle yaparız. RollingUpdate ile yeni deployment yapılınca eski podlar yavaş yavaş kapatılır ve yeni podlar yavaş yavaş açılır
kind: Deployment
apiVersion: apps/v1
metadata:
  name: example-zookeeper
  namespace: kafka-example
  labels:
    app: example-zookeeper
spec:
  replicas: 1
  selector:
    matchLabels:
      app: example-zookeeper
  template:
    metadata:
      labels:
        app: example-zookeeper
    spec:
      containers:
        - name: example-zookeeper
          image: jplock/zookeeper
          ports:
            - containerPort: 2181
              protocol: TCP
          imagePullPolicy: IfNotPresent
      restartPolicy: Always
      dnsPolicy: ClusterFirst
      schedulerName: default-scheduler
      enableServiceLinks: true
  strategy:
    type: RollingUpdate
maxSurge ve maxUnavailable Alanları Neden Lazım ?
Çünkü RollingUpdate ile eski ve yeni pod'lar birlikte çalışırlar. Yeni pod'u yaratırken istenilen replica sayısı geçici olarak aşılır. maxSurge ile bu aşma miktarı kontrol edilir. maxUnavailable ile de her seferindeki en fazla kaç tane Pod'un kullanım dışı (unavailable) olabileceği belirtilir. Böylece hizmette kesinti sınırlandırılır

maxSurge Alanı
Varsayılan değer 1. 
Açıklaması şöyle. Sayı veya yüzde ile belirtilir. İstenilen replica sayısının geçici olarak ne kadar daha aşılabileceğini belirtir.
The maxSurge property controls the maximum number of additional pods that can be created during a rolling update. It specifies the number or percentage of pods above the desired replica count that can be temporarily created. During an update, Kubernetes creates new pods to replace the old ones, and the maxSurge property ensures that the total number of pods does not exceed a certain limit.
Açıklaması şöyle
The values for maxSurge and maxUnavailable can be specified in two formats: absolute numbers and percentages.

- Absolute Numbers: You can set a fixed number of pods as the value for maxSurge and maxUnavailable. For example, maxSurge: 2 means that a maximum of 2 additional pods can be created, and maxUnavailable: 1 indicates that a maximum of 1 pod can be unavailable at a time.

- Percentages: You can specify the values as percentages of the desired replica count. For example, maxSurge: 50% means that 50% of the desired replica count can be temporarily exceeded, and maxUnavailable: 25% indicates that 25% of the desired replica count can be unavailable.
Örnek
Şöyle yaparız
strategy:
  type : RollingUpdate
  rollingUpdate:
    type: RollingUpdate
      maxSurge : 25%
      maxUnavailable : 25%
Açıklaması şöyle
spec.strategy.rollingUpdate.maxSurge 
as 25% specifying the maximum number of Pods that can be created over the required replica number.
spec.strategy.rollingUpdate.maxUnavailable 
as 25% which allows upto 25% of pods can be unavailable during a deployment.
maxUnavailable Alanı
Varsayılan değer %25.
Açıklaması şöyle. Sayı veya yüzde ile belirtilir. Bir seferde toplam kaç tane pod'un unavailable olabileceğini belirtir.
The maxUnavailable property determines the maximum number or percentage of pods that can be unavailable during a rolling update. It specifies the maximum number of pods that can be simultaneously removed from service during the update progresses. By default, Kubernetes terminates one pod at a time while creating new pods, ensuring that the desired replica count is maintained.
Örnek
Şöyle yaparız
apiVersion: apps/v1
kind: Deployment
metadata:
  name: my-deployment
spec:
  replicas: 3
  strategy:
    type: RollingUpdate
    rollingUpdate:
      maxSurge: 1
      maxUnavailable: 1
  template:
    metadata:
      labels:
        app: my-app
    spec:
      containers:
        - name: my-container
          image: my-image:latest
          ports:
            - containerPort: 8080
Açıklaması şöyle
In this example, we have set both maxSurge and maxUnavailable to 1, indicating that during the rolling update, one additional pod can be created and one pod can be unavailable at a time
Bazı senaryolar
Açıklaması şöyle
Let’s explore few scenarios.

Scenario 1: maxSurge: 1, maxUnavailable: 0

Desired replica count: 3
During the update, Kubernetes creates 1 additional pod at a time while keeping all existing pods running.
No pods are removed before the new pods become ready.

Scenario 2: maxSurge: 0, maxUnavailable: 1

Desired replica count: 3
During the update, no additional pods are created (maxSurge: 0), but one pod can be unavailable (maxUnavailable: 1).
Kubernetes terminates one pod at a time, ensuring that the desired replica count is maintained. So, at any given time, there will be 2 pods running and 1 pod unavailable.

Scenario 3: maxSurge: 25%, maxUnavailable: 25%

Desired replica count: 4
During the update, Kubernetes can create up to 25% of the desired replica count as additional pods (maxSurge: 25%). In this case, it can create a maximum of 1 additional pod.
Similarly, up to 25% of the desired replica count can be unavailable (maxUnavailable: 25%). In this case, it can have a maximum of 1 pod unavailable at a time.
This allows flexibility during the update process, ensuring that there is no significant impact on the availability of the application.


13 Ekim 2022 Perşembe

containerd - High Level Container Runtime Gerçekleştirimi

Giriş
Açıklaması şöyle
Extracted from the early docker source code, it is also the current industry-standard container runtime.By default it uses runC under the hood. Like the rest of the container tools that originated from Docker, it is the current de-facto standard CRI.
Açıklaması şöyle
It was initiated by Docker Inc. and donated to CNCF in March of 2017.
 Not: containerd'yi debug için bir yazı burada

Ayarlar
High Level Runtime'ın görevlerinden bir tanesi Container Registry'den image'ı almak ve çalıştırması için  Low-Level Container Runtime'a geçmek. containerd ayarlarıyla ilgili bir yazı burada. Ayarlar /etc/containerd/config.toml dosyasında tutuluyor

Komut Satırı
Örnek
Şöyle yaparız
# Download a container image.
sudo ctr images pull docker.io/library/redis:latest

#Running a container.
sudo ctr container create docker.io/library/redis:latest redis

# And if you want to delete a container, run the following command.
sudo ctr container delete redis

#You can list containers and images by the following command.
sudo ctr images list
sudo ctr container list


11 Ekim 2022 Salı

kubectl set image seçeneği - Rolling Update İçindir

Giriş
Açıklaması şöyle. Rolling update ile kullanılır
1. Suppose there is an already existing deployment running 3 replicas of a pod with image nginx:1.7.0.
2. Now you wish to change the version of the image.
3. This can be done by changing the version of the image in deployment file and running the command: `kubectl apply -f <deployment file path>`
4. The above can also be done by: `kubectl set image deployment myapp-deployment nginx=nginx.1.7.1`.
4. Remember, if we do step #4, then there will be inconsistency in the actual file and the deployment definition in the cluster
5. Run command: `kubectl describe deployment <deployment name>` to see the details of deployment, and notice the difference in both strategies.
Eğer Rolling Update işlemini geri almak istersek "kubectl rollout undo" kullanılır

Örnek
Şöyle yaparız
$ kubectl set image deployment.v1.apps/test-deploy nginx=nginx:1.16.1


Kubernetes kind : Deployment Strategy

Giriş
Açıklaması şöyle
Options for strategy type include:

Recreate: The Recreate strategy ensures that old and new pods do not run concurrently. This can be useful when synchronizing changes to a backend datastore that does not support access from two different client versions.

Rolling update: The RollingUpdate strategy ensures there are some pods available to continue serving traffic during the update, so there is no downtime. However, both the old and new pods run side by side while the update is taking place, meaning any data stores or clients must be able to interact with both versions.
1. Recreate
Açıklaması şöyle. Geriye uyumluluğun kırıldığı durumda kullanılır. Hizmette kesinti olur
1. Suppose there are 5 instances of your app running
2. When deploying a new version, we can destroy the 5 instances of older version and then deploy 5 instances of newer version.
3. The issue is there will be a downtime.
4. This is majorly done during major changes, breaking changes or when backward compatibility is not possible.
5. This is not the default strategy in K8s.
Örnek
Şöyle yaparız. Recreate ile yeni deployment yapılınca eski podlar kapatılır ve yeni podlar açılır
apiVersion : apps/v1
kind : Deployment
metadata:
  name: echo-blue
spec:
  selector:
    matchLabels:
      app: echo
  strategy:
    type: Recreate
  replicas: 2
2. RollingUpdate
RollingUpdate yazısına taşıdım

10 Ekim 2022 Pazartesi

Rancher

Giriş 
Açıklaması şöyle
Rancher is an open source platform for running containers in production. It allows you to run containers on Kubernetes, Mesos and Docker Swarm. The project was started by Rancher Labs, which offers commercial support for the platform.


This makes it easy to use if you already have knowledge of Docker or Kubernetes and gives you the option to use Rancher’s UI or set up your own control panel if you prefer that.

The solution comes with great documentation with lots of tutorials which will help get you up and running quickly. It also has a great user interface that makes managing clusters really easy even if this is your first time using Kubernetes-like solutions such as RancherOS (which runs on top of CoreOS) or Cattle (which runs on top of Ubuntu).


9 Ekim 2022 Pazar

minikube İle Servislere Erişim

1. LoadBalancer Service
LoadBalancer tipi servise direkt erişim mümkün değil. minikube tunnel komutu kullanılır. Böylece LoadBalancer'a IP verilir. Daha sonra  minikube service ile service erişebiliriz

2. NodePort Service
minikube service komutu kullanılır.

Kubernetes kind: Cluster

Örnek Şöyle yaparız apiVersion: cluster.k8s.io/v1alpha1 kind: Cluster metadata: name: my-cluster spec: autoscaler: enabled: true ...